docker 启动详解 一些命令 1 2 3 4 5 6 7 8 9 10 11 12 13 14 15 16 17 18 19 20 21 22 23 24 25 26 27 28 29 30 31 32 33 34 35 36 37 38 39 40 41 docker run [OPTIONS] IMAGE [COMMAND] [ARG...] docker run -itd --name mycentos centos [root@VM-12 -17 -centos ~] "Cmd" : [ "/bin/bash" ], [root@VM-12 -17 -centos ~] "Cmd" : [ "mysqld" ], .... "Entrypoint" : [ "docker-entrypoint.sh" ], docker create [OPTIONS] IMAGE [COMMAND] [ARG ...] [root@VM-12 -17 -centos ~] TYPE TOTAL ACTIVE SIZE RECLAIMABLE Images 59 18 9.998 GB 6.048 GB (60 %) Containers 28 5 702.1 MB 438.5 MB (62 %) Local Volumes 23 7 4.011 GB 651.1 MB (16 %) Build Cache 0 0 0 B 0 B [root@VM-12 -17 -centos ~] [root@VM-12 -17 -centos ~]
启动参数 -i -t -d是什么? -i 交互式 表示可以读入用户输入的命令
-t 产生一个终端 执行用户输入的命令
所以 -it 往往配合使用
-d 后台运行容器命令 并打印容器ID 对于有前台进程或守护进程(如httpd,mysqld)的容器 可以直接使用-d参数创建运行 否则容器将会创建后立即停止 除非指定了一个可以一直执行的命令来保持容器有事情可做
使用-itd 组合参数 可以使得容器在创建运行时设置一个默认或指定的主进程的例如/bin/bash 保证容器不会因为PID=1的进程退出而停止
就docker run来说 若单纯只使用docker run -it bash 来启动并运行容器 会直接进入容器内部 此时PID=1的进程就是bash 这意味着使用exit退出容器时 PID=1的主进程被终止 容器也就因此停止.
1 2 3 4 5 6 # 以centos为例 此时默认执行的主进程是/bin/bash 若直接使用exit 退出进程 将导致容器停止 [root@VM-12-17-centos ~]# docker run -it --name mycentos2 centos [root@431f30934191 /]# ps -elf F S UID PID PPID C PRI NI ADDR SZ WCHAN STIME TTY TIME CMD 4 S root 1 0 1 80 0 - 3009 do_wai 09:27 pts/0 00:00:00 /bin/bash 4 R root 15 1 0 80 0 - 11163 - 09:27 pts/0 00:00:00 ps -elf
方法一 使用 Ctrl + PQ 组合键退出容器
若最初使用的是-it参数来创建并启动的容器,使用Ctrl + PQ 组合键退出容器不会导致当前命令进程被终止 而是在容器后台继续运行.
方法二 使用 -itd 组合参数运行容器 (推荐)
直接使用-itd 组合参数来创建并启动容器可以直接在容器后台运行命令而不用进入容器,这样也就保证主进程不会因exit而被终止.
1 2 3 4 5 6 7 8 9 10 11 [root@VM-12-17-centos ~]# docker run -itd --name mycentos centos 61bb24c54e2832224f3796941a94a32657928b2c552729e1c8a832f7c74182a4 [root@VM-12-17-centos ~]# docker ps --filter name=mycentos CONTAINER ID IMAGE COMMAND CREATED STATUS PORTS NAMES 61bb24c54e28 centos "/bin/bash" About a minute ago Up About a minute mycentos [root@VM-12-17-centos ~]# docker exec -it mycentos bash [root@61bb24c54e28 /]# ps -elf F S UID PID PPID C PRI NI ADDR SZ WCHAN STIME TTY TIME CMD 4 S root 1 0 0 80 0 - 3009 poll_s 09:43 pts/0 00:00:00 /bin/bash 4 S root 16 0 0 80 0 - 3009 do_wai 09:45 pts/1 00:00:00 bash 4 R root 30 16 0 80 0 - 11163 - 09:45 pts/1 00:00:00 ps -elf
可以看到再次使用exec -it bash进入容器,并使用exit退出容器时,终止的将只是当前bash 而不是主进程的bash.
方法三 使用start 命令再次启动容器
若因为使用 -it 参数创建并运行容器 exit退出终端导致容器被停止的情况下,可以直接实现docker start 再次启动容器 这时将不会自动进入容器内部,也就不会因为exit退出而导致容器停止.
1 2 3 4 5 6 7 8 9 10 11 12 13 14 15 16 [root@VM-12-17-centos ~]# docker run -it --name mycentos3 centos [root@32bee8ad0d82 /]# ps -elf F S UID PID PPID C PRI NI ADDR SZ WCHAN STIME TTY TIME CMD 4 S root 1 0 0 80 0 - 3009 do_wai 09:51 pts/0 00:00:00 /bin/bash 4 R root 15 1 0 80 0 - 11163 - 09:51 pts/0 00:00:00 ps -elf [root@32bee8ad0d82 /]# exit exit [root@VM-12-17-centos ~]# docker start mycentos3 mycentos3 [root@VM-12-17-centos ~]# docker exec -it mycentos3 bash [root@32bee8ad0d82 /]# ps -elf F S UID PID PPID C PRI NI ADDR SZ WCHAN STIME TTY TIME CMD 4 S root 1 0 0 80 0 - 3009 poll_s 09:51 pts/0 00:00:00 /bin/bash 4 S root 15 0 0 80 0 - 3009 do_wai 09:52 pts/1 00:00:00 bash 4 R root 30 15 0 80 0 - 11163 - 09:52 pts/1 00:00:00 ps -elf
此时使用start再次启动容器的效果和直接使用-itd组合参数的效果一样.
关于启动nginx容器 对于nginx 使用 docker run -d
Nginx的docker仓库原文说明如下:
1 2 3 4 5 6 7 8 9 10 11 12 13 14 If you add a custom CMD in the Dockerfile, be sure to include -g daemon off; in the CMD in order for nginx to stay in the foreground, so that Docker can track the process properly (otherwise your container will stop immediately after starting)! Running nginx in debug mode Images since version 1.9.8 come with nginx-debug binary that produces verbose output when using higher log levels. It can be used with simple CMD substitution: $ docker run --name my-nginx -v /host/path/nginx.conf:/etc/nginx/nginx.conf:ro -d nginx nginx-debug -g 'daemon off;' Similar configuration in docker-compose.yml may look like this: web: image: nginx volumes: - ./nginx.conf:/etc/nginx/nginx.conf:ro command: [nginx-debug, '-g', 'daemon off;']
以指定nginx daemon off (前台运行) 所以可以直接使用-d
容器的停止与暂停
1 2 3 4 5 docker pause docker stop
若容器内没有ps等命令 需要手动安装组件
1 apt-get update && apt-get install procps vim iproute2
官方文档-docker run | Docker Documentation
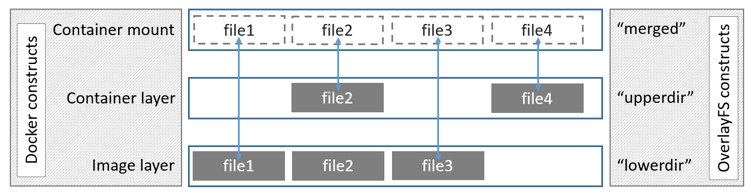
镜像的底层存储 1.只读层
位于镜像最底层,属于基础镜像的层次,以只读方式挂载,readonly+whiteout,
2.可读写层
位于镜像最上层,挂载方式是rw,在写之前目录是空的,一旦对容器进行写操作会以增量的形式出现在该层,若是删除只读层的文件,则AUFS会通过创建whiteout来把只读层的文件遮挡起来。实际的删除操作 其实就是创建了一个.wh的”白障“ 隐藏了需要删除的文件。
3.init层
是以-init结尾的层,夹在只读和可读写层之间,用来存放 /etc/hosts/,etc/resolv.conf
1 2 3 4 5 6 7 8 9 10 11 12 13 14 15 16 17 18 19 20 21 22 23 24 25 26 27 28 29 30 31 32 33 34 35 36 37 38 39 40 41 42 43 44 45 46 47 48 49 50 51 52 53 54 55 56 57 58 59 60 61 62 63 # 查看镜像分层情况 [root@VM-12-17-centos ~]# docker history nginx IMAGE CREATED CREATED BY SIZE COMMENT c316d5a335a5 2 weeks ago /bin/sh -c #(nop) CMD ["nginx" "-g" "daemon… 0B <missing> 2 weeks ago /bin/sh -c #(nop) STOPSIGNAL SIGQUIT 0B <missing> 2 weeks ago /bin/sh -c #(nop) EXPOSE 80 0B <missing> 2 weeks ago /bin/sh -c #(nop) ENTRYPOINT ["/docker-entr… 0B <missing> 2 weeks ago /bin/sh -c #(nop) COPY file:09a214a3e07c919a… 4.61kB <missing> 2 weeks ago /bin/sh -c #(nop) COPY file:0fd5fca330dcd6a7… 1.04kB <missing> 2 weeks ago /bin/sh -c #(nop) COPY file:0b866ff3fc1ef5b0… 1.96kB <missing> 2 weeks ago /bin/sh -c #(nop) COPY file:65504f71f5855ca0… 1.2kB <missing> 2 weeks ago /bin/sh -c set -x && addgroup --system -… 61.1MB <missing> 2 weeks ago /bin/sh -c #(nop) ENV PKG_RELEASE=1~bullseye 0B <missing> 2 weeks ago /bin/sh -c #(nop) ENV NJS_VERSION=0.7.2 0B <missing> 2 weeks ago /bin/sh -c #(nop) ENV NGINX_VERSION=1.21.6 0B <missing> 2 weeks ago /bin/sh -c #(nop) LABEL maintainer=NGINX Do… 0B <missing> 2 weeks ago /bin/sh -c #(nop) CMD ["bash"] 0B <missing> 2 weeks ago /bin/sh -c #(nop) ADD file:90495c24c897ec479… 80.4MB # LowerDir 底层目录;diff # MergedDir 合并层;容器最终的完整工作目录全部内容在合并层; # UpperDir 容器层;数据卷在容器层 # WorkDir 临时层;工作目录 [root@VM-12-17-centos ~]# docker inspect nginx ..... "GraphDriver": { "Data": { "LowerDir": "/var/lib/docker/overlay2/f71d0cb3498f29127e6bf51f44447cddb33e267447a238e4e9720f8d9b2fd551/diff:/var/lib/docker/overlay2/56e2ff6ad94708b78e33d6a12831d6bd69b5d37970862a7d515e1ea15f4adcad/diff:/var/lib/docker/overlay2/cb5e3a564eb4c301948f0b83cacad972025c1eb047aae87d40f0ed6779de7adb/diff:/var/lib/docker/overlay2/3b42d68712916841aac9853fed37b6a9fa76dc23f030af36ec1f9702635d592c/diff:/var/lib/docker/overlay2/f25a14707d505e3aac1e572c98d2a52322ade961371d202720b963d3348dd064/diff", "MergedDir": "/var/lib/docker/overlay2/6e452252fc47326ef211b23c96fffef991f41b7aac62030247c1c1829b8e0b10/merged", "UpperDir": "/var/lib/docker/overlay2/6e452252fc47326ef211b23c96fffef991f41b7aac62030247c1c1829b8e0b10/diff", "WorkDir": "/var/lib/docker/overlay2/6e452252fc47326ef211b23c96fffef991f41b7aac62030247c1c1829b8e0b10/work" }, "Name": "overlay2" }, .... # 底层LowerDir的最后一个路径为镜像底层linux系统 root@VM-12-17-centos work]# cd /var/lib/docker/overlay2/f25a14707d505e3aac1e572c98d2a52322ade961371d202720b963d3348dd064/diff [root@VM-12-17-centos diff]# ls -i 1051126 bin 1051196 dev 1051367 home 1051575 lib64 1051578 mnt 1051580 proc 1051584 run 1051649 srv 1051651 tmp 1055423 var 1051195 boot 1051197 etc 1051368 lib 1051577 media 1051579 opt 1051581 root 1051587 sbin 1051650 sys 1051652 usr [root@VM-12-17-centos diff]# # 发现所有nginx容器的linux系统文件inode一致 [root@VM-12-17-centos ~]# docker exec -it mynginx bash root@95386a0daa63:/# ls -i 1051126 bin 1180483 docker-entrypoint.d 1051367 home 1051577 media 1 proc 1051587 sbin 1056343 tmp 1051195 boot 1180443 docker-entrypoint.sh 1056331 lib 1051578 mnt 1051581 root 1051649 srv 1056344 usr 29756778 dev 1180497 etc 1051575 lib64 1051579 opt 1051584 run 1 sys 1056512 var root@95386a0daa63:/# exit exit [root@VM-12-17-centos ~]# docker exec -it mynginx2 bash root@75cc2dc59c57:/# ls -i 1051126 bin 1180483 docker-entrypoint.d 1051367 home 1051577 media 1 proc 1051587 sbin 1056343 tmp 1051195 boot 1180443 docker-entrypoint.sh 1056331 lib 1051578 mnt 1051581 root 1051649 srv 1056344 usr 29766104 dev 1180574 etc 1051575 lib64 1051579 opt 1051584 run 1 sys 1056512 var root@75cc2dc59c57:/# exit # -s查看镜像实际占用大小 [root@VM-12-17-centos diff]# docker ps -s CONTAINER ID IMAGE COMMAND CREATED STATUS PORTS NAMES SIZE 75cc2dc59c57 nginx "/docker-entrypoint.…" 3 days ago Up 3 days 0.0.0.0:87->80/tcp mynginx2 20.7MB (virtual 162MB) 95386a0daa63 nginx "/docker-entrypoint.…" 3 days ago Up 3 days 0.0.0.0:88->80/tcp mynginx 20.7MB (virtual 162MB)
综上可以发现每个镜像的不同容器共用一套底层linux ,使得实际占用大小大大缩小了。
批量删除镜像
1 2 3 4 5 # 删除全部镜像 docker rmi $(docker images -aq) # 用正则筛选 docker rmi $(docker images --format "{{.ID}}" --filter reference="xx/fangzhen/cms:*")
镜像存储于root空间,若剩余空间容量不组15%,将会发生镜像驱逐。
centos-root扩容 1 2 3 4 5 6 7 8 9 10 11 12 13 14 15 16 17 18 19 20 21 22 23 24 25 26 27 28 29 30 31 32 33 34 # 查看分区情况 [root@localhost ~]# fdisk -l Disk /dev/vda: 214.7 GB, 214748364800 bytes, 419430400 sectors Units = sectors of 1 * 512 = 512 bytes Sector size (logical/physical): 512 bytes / 512 bytes I/O size (minimum/optimal): 512 bytes / 512 bytes Disk label type: dos Disk identifier: 0x000bbc00 Device Boot Start End Blocks Id System /dev/vda1 * 2048 2099199 1048576 83 Linux /dev/vda2 2099200 6293503 2097152 82 Linux swap / Solaris /dev/vda3 6293504 83886079 38796288 83 Linux Disk /dev/sda: 21474.8 GB, 21474836480000 bytes, 41943040000 sectors Units = sectors of 1 * 512 = 512 bytes Sector size (logical/physical): 512 bytes / 512 bytes I/O size (minimum/optimal): 512 bytes / 512 bytes # 创建物理卷 pvcreate /dev/sda3 # 将添加新的物理卷,加载到centos卷组,使用 vgextend centos /dev/sda3。 # 增加/dev/mapper/centos-root大小,增加50G。使用 lvresize -L +50G /dev/mapper/centos-root # 同步文件系统 xfs_growfs /dev/mapper/centos-root
镜像的写时复制 修改容器内文件时会在UpperDir创建上层目录来保存修改,底层镜像那内容永远不会变,它是只读的
docker存储驱动overlay2的基本工作原理如下
我们通过镜像创建的容器包括了三层。最下面的是一个只读的镜像层,第二层是容器层,在他上面最上面的容器挂载层。最上层显示的是我们在容器上直接看见的内容,他通过UnionFS,或者说类似软连接的方式,文件的路径指向了容器层或者是镜像层。当我们尝试读取,修改或者创建一个新的文件时,我们总是从上到下进行搜索,如果在容器层找到了,那么就直接打开;如果容器层没有,那就从镜像层打开。如果是一个新建的文档,那么就从镜像层拷贝到容器层,再打开操作。
overlay2 对文件的修改采用的是写时复制的工作机制,这种工作机制可以最大程度节省存储空间。具体的文件操作机制如下。
第一次修改文件:当我们第一次在容器中修改某个文件时,overlay2 会触发写时复制操作,overlay2 首先从镜像层复制文件到容器层,然后在容器层执行对应的文件修改操作。
overlay2 写时复制的操作将会复制整个文件,如果文件过大,将会大大降低文件系统的性能,因此当我们有大量文件需要被修改时,overlay2 可能会出现明显的延迟。好在,写时复制操作只在第一次修改文件时触发,对日常使用没有太大影响。
删除文件或目录:当文件或目录被删除时,overlay2 并不会真正从镜像中删除它,因为镜像层是只读的,overlay2 会创建一个特殊的文件或目录,这种特殊的文件或目录会阻止容器的访问。
AUFS-联合文件系统是曾经的docker存储驱动
docker commit 提交镜像修改
官方文档-Docker存储驱动overkay2
卷挂载方式 -mount 方式
在docker-compose中统一配置docker容器,大多数还是选择mount bind因为可以挂单个文件,volume不行,它只能挂目录
bind-mount 其实是一个inode替换的过程,在Linux操作系统中,inode可以理解为存放文件内容的对象,而dentry,也叫目录项,就是访问这个inode所使用的“指针”。
mount –bind /home /test ,会把/home挂载到/test上,实际上相当于吧/test的/dentry,指向修改为/home的inode,这样修改/test,实际上修改的是/home对应的inode。
-v 方式 (常用)
bind挂载 和 volume挂载
-v 绝对路径:容器挂载路径 以宿主机为主 容器或者宿舍机没有文件夹会创建
-v 卷名称:容器挂载路径 容器有卷没有 卷会创建 容器没有卷有 容器会创建(具名挂载)
-v 容器挂载路径 自动创建卷(匿名挂载)
官方文档-Docker卷的使用
Dockerfile指令 1 2 # . 代表当前目录作为初始上下文环境 若/则是linux的/目录为初始目录 docker build -f Dockerfile -t test:1 .
1 2 3 4 5 6 7 8 9 10 11 12 13 14 15 16 17 18 19 20 21 22 23 24 25 26 27 28 29 30 31 32 33 34 35 36 37 38 39 40 41 FROM alpineLABEL maintainer="wyt" \ WORKDIR /add ARG param=wyt msg="hello" ENV app=123 RUN echo 00 ADD XXX /dest/ COPY --chown VOLUME ["/mysql" ,"/app" ] CMD echo 00 CMD ["/bin/sh" ,"-c" ,"echo 111;echo $param " ] CMD ["5" ,"baidu.com" ] ENTRYPOINT ["ping" ,"-c" ]
CMD和ENTRYPOINT指令都定义了运行容器时执行的命令。很少有规则描述他们的合作。
Dockerfile 应该至少指定一个CMD或ENTRYPOINT命令。
ENTRYPOINT应在将容器用作可执行文件时定义。CMD应该用作为ENTRYPOINT命令定义默认参数或在容器中执行临时命令的一种方式。CMD使用替代参数运行容器时将被覆盖。
下表显示了针对不同ENTRYPOINT/CMD组合执行的命令:
No ENTRYPOINT
ENTRYPOINT exec_entry p1_entry
ENTRYPOINT [“exec_entry”, “p1_entry”]
No CMD error, not allowed /bin/sh -c exec_entry p1_entry
exec_entry p1_entry
CMD [“exec_cmd”, “p1_cmd”] exec_cmd p1_cmd
/bin/sh -c exec_entry p1_entry
exec_entry p1_entry exec_cmd p1_cmd
CMD [“p1_cmd”, “p2_cmd”] p1_cmd p2_cmd
/bin/sh -c exec_entry p1_entry
exec_entry p1_entry p1_cmd p2_cmd
CMD exec_cmd p1_cmd /bin/sh -c exec_cmd p1_cmd
/bin/sh -c exec_entry p1_entry
exec_entry p1_entry /bin/sh -c exec_cmd p1_cmd
Dockerfile多阶段构建 1 2 3 4 5 6 7 8 9 10 11 12 13 14 15 16 17 18 19 20 21 22 23 24 25 26 27 28 29 30 31 32 33 34 35 36 37 38 39 FROM maven:3.6 .1 -jdk-8 -alpine AS buildappWORKDIR /app COPY pom.xml . COPY config . COPY src . RUN mvn clean install package '-Dmaven.test.skip=true' RUN pwd && ls -l RUN cp /app/target/*.jar /app.jar RUN ls -l FROM openjdk:8 -jre-alpineRUN ln -sf /usr/share/zoneinfo/Asia/Shanghai /etc/localtime && echo 'Asia/Shanghai' >/etc/timezone RUN touch /app.jar LABEL maintainer="astrals24@qq.com" COPY --from=buildapp /app.jar /app.jar COPY --from=buildapp /config /config ENTRYPOINT ["sh" ,"-c" ,"java -XX:+UnlockExperimentalVMOptions -XX:+UseCGroupMemoryLimitForHeap -jar app.jar" ]
官方文档-Dockerfile
daemon.json热更新 1 2 3 4 5 6 tee /etc/docker/daemon.json <<-'EOF' { "registry-mirrors": ["https://docker.mirrors.ustc.edu.cn"], "insecure-registries": ["127.0.0.1/8","hub.data.wust.edu.cn:30880"] } EOF
1 2 3 4 5 6 7 8 9 10 11 12 13 14 15 16 17 18 19 { "data-root": "/var/lib/docker", "exec-opts": ["native.cgroupdriver=systemd"], "registry-mirrors": [ "https://docker.mirrors.ustc.edu.cn", "http://hub-mirror.c.163.com" ], "insecure-registries" ["127.0.0.1/8","hub.data.wust.edu.cn:30880"], "max-concurrent-downloads": 10, "live-restore": true, "log-driver": "json-file", "log-level": "warn", "log-opts": { "max-size": "50m", "max-file": "1" }, "storage-driver": "overlay2" }
修改完daemon.json后,只需要执行以下指令即可 无需重启容器 和 daemon -reload
1 2 3 4 5 sudo kill -SIGHUP $(pidof dockerd) docker info
可热更新配置
1 2 3 4 5 6 7 8 9 10 11 12 13 14 15 16 17 18 19 20 21 22 23 24 25 26 27 28 29 30 31 debug: it changes the daemon to debug mode when set to true. cluster-store: it reloads the discovery store with the new address. cluster-store-opts: it uses the new options to reload the discovery store. cluster-advertise: it modifies the address advertised after reloading. labels: it replaces the daemon labels with a new set of labels. live-restore: Enables keeping containers alive during daemon downtime. max-concurrent-downloads: it updates the max concurrent downloads for each pull. max-concurrent-uploads: it updates the max concurrent uploads for each push. default-runtime: it updates the runtime to be used if not is specified at container creation. It defaults to “default” which is the runtime shipped with the official docker packages. runtimes: it updates the list of available OCI runtimes that can be used to run containers. authorization-plugin: it specifies the authorization plugins to use. allow-nondistributable-artifacts: Replaces the set of registries to which the daemon will push nondistributable artifacts with a new set of registries. insecure-registries: it replaces the daemon insecure registries with a new set of insecure registries. If some existing insecure registries in daemon’s configuration are not in newly reloaded insecure resgitries, these existing ones will be removed from daemon’s config. registry-mirrors: it replaces the daemon registry mirrors with a new set of registry mirrors. If some existing registry mirrors in daemon’s configuration are not in newly reloaded registry mirrors, these existing ones will be removed from daemon’s config. shutdown-timeout: it replaces the daemon’s existing configuration timeout with a new timeout for shutting down all containers. features: it explicitly enables or disables specific features.
官方docker daemon.json
1 2 3 4 5 6 7 8 9 10 11 12 13 14 15 16 17 18 19 20 21 22 23 24 25 26 27 28 29 30 31 32 33 34 35 36 37 38 39 40 41 42 43 44 45 46 47 48 49 50 51 52 53 54 55 56 57 58 59 60 61 62 63 64 65 66 67 68 69 70 71 72 73 74 75 76 77 78 79 80 81 82 83 84 85 86 87 88 89 90 91 92 { "authorization-plugins": [], "data-root": "", "dns": [], "dns-opts": [], "dns-search": [], "exec-opts": [], "exec-root": "", "experimental": false, "features": {}, "storage-driver": "", "storage-opts": [], "labels": [], "live-restore": true, "log-driver": "json-file", "log-opts": { "max-size": "10m", "max-file":"5", "labels": "somelabel", "env": "os,customer" }, "mtu": 0, "pidfile": "", "cluster-store": "", "cluster-store-opts": {}, "cluster-advertise": "", "max-concurrent-downloads": 3, "max-concurrent-uploads": 5, "default-shm-size": "64M", "shutdown-timeout": 15, "debug": true, "hosts": [], "log-level": "", "tls": true, "tlsverify": true, "tlscacert": "", "tlscert": "", "tlskey": "", "swarm-default-advertise-addr": "", "api-cors-header": "", "selinux-enabled": false, "userns-remap": "", "group": "", "cgroup-parent": "", "default-ulimits": { "nofile": { "Name": "nofile", "Hard": 64000, "Soft": 64000 } }, "init": false, "init-path": "/usr/libexec/docker-init", "ipv6": false, "iptables": false, "ip-forward": false, "ip-masq": false, "userland-proxy": false, "userland-proxy-path": "/usr/libexec/docker-proxy", "ip": "0.0.0.0", "bridge": "", "bip": "", "fixed-cidr": "", "fixed-cidr-v6": "", "default-gateway": "", "default-gateway-v6": "", "icc": false, "raw-logs": false, "allow-nondistributable-artifacts": [], "registry-mirrors": [], "seccomp-profile": "", "insecure-registries": [], "no-new-privileges": false, "default-runtime": "runc", "oom-score-adjust": -500, "node-generic-resources": ["NVIDIA-GPU=UUID1", "NVIDIA-GPU=UUID2"], "runtimes": { "cc-runtime": { "path": "/usr/bin/cc-runtime" }, "custom": { "path": "/usr/local/bin/my-runc-replacement", "runtimeArgs": [ "--debug" ] } }, "default-address-pools":[ {"base":"172.80.0.0/16","size":24}, {"base":"172.90.0.0/16","size":24} ] }
docker网络 Docker网络常见命令
1 2 3 4 5 6 7 8 9 10 11 12 13 14 15 16 17 18 19 20 21 22 23 24 # 列出Docker全部网络 docker network ls # 创建新的Docker网络 docker network create # 创建名为overnet的覆盖网络 docker network create -d overlay overnet # 若不指定-d 则默认bridge模式 在bridge下 会自动创建一个网卡 br-xxx 此网卡对于本自定义网络中的容器充当docker0的效果, # 当其他网络 比如docker0网络中的容器 想连接自定义网络中的容器 需要把该容器加入自定义网络中 # 此时该容器与自定义网络中的容器通信时将不经过docker0网卡 直接通过veth与自定义网络通信 docker network connect 自定义网络名 接入容器名 # 查询详细信息 docker network instpect # 删除docker未使用网络 docker network prune # 删除docker网络 docker network rm
Docker网络三个主要组成部分:
容器网络模型(CNM) : 规定了docker网络架构的基础组成要素 k8s 使用的CNI Why Kubernetes doesn’t use libnetwork
Libnetwork:是CNM的具体实现的外部类库,Go语言编写,早期从docker daemon中拆分的网络部分。
驱动:实现特定网络拓扑方式来扩展模型的能力
CNM 有3个要素
沙盒:独立的网络栈 包括以太网接口、端口、路由表和DNS配置
终端:虚拟网络接口,负责创建连接并将沙盒连接到网络
网络:网桥的软件实现,
Libnetwork
除了实现CNM中三个组件还实现了服务发现,基于ingress的负载均衡,网络控制和管理层功能。
服务发现 利用了Docker内置的DNS服务器,为每个容器提供DNS解析功能
驱动
bridge 负责网络资源的创建和管理
Libnetwork同时激活多个驱动,即docker环境可支持一个庞大的异构网络
docker单机桥接网络 – 对外发布服务依赖于端口映射 不易扩展 只适合小型项目
单机桥接网络中的容器只能与位于相同网络中的容器进行通信 ,可以通过端口映射来绕开这个限制。(这里的端口映射如何实现的?)
默认模式,此模式会为每一个容器分配、设置IP等,并将容器连接到一个docker0虚拟网桥,通过docker0网桥以及Iptables nat表配置与宿主机通信。
我们每启动一个docker容器,docker就会给docker容器分配一个ip,并且多一对网卡(容器和主机分别+1)veth-pair技术实现
host(本质是不会为进程启用 Network Namespace,所以和宿主机其他进程一样,直接共享宿主机网络栈。 )
容器将不会虚拟出自己的网卡,配置自己的IP等,而是使用宿主机的IP和端口。
host 模式简单并且性能高,host 模式下面的网络模型是最简单和最低延迟的模式,容器进程直接与主机网络接口通信,与物理机性能一致,host 不利于网络自定
配置和管理,并且所有主机的容器使用相同的IP。也不利于主机资源的利用。对网络性能要求比较高,可以使用该模式。否则应该使用其他模式
该模式关闭了容器的网络功能。
想要容器之间通过容器名互相访问 需要新建自定义网络,
默认网络和自定义网络区别
这个问题问得好,官方特意解释了这两个网卡的区别。
User-defined bridges provide automatic DNS resolution between containers.
文档中提到了 –link 参数,官方文档中已经不推荐使用 –link 参数,并且最终可能会被删除,所以最好不要使用 –link 参数来连接两个容器,并且它有多个缺点。
如果使用 –link 参数,需要在容器之间手动创建链接,这些链接需要双向创建,如果容器多于两个的话,将会很困难。或者也可以通过编辑 hosts 文件的方式来指定解析结果,但是这样将会非常难以调试。
默认网卡测试
总结
以上就是通过自定义网卡来使两个容器互相连接的方法,这种方法便于部署和调试,而且还提供了网络隔离功能,两个容器之间不会互相干扰,可以随时断开或者连接,并且可以使用 –subnet 参数指定自定义网络的 IP 段,这里就不详细展开了。
原文链接:https://blog.csdn.net/moyu11111/article/details/120841853
单机网络 - veth-pair - Linux namespace技术
默认的bridge网络被映射到内核中为docker0的Linux网桥
1 2 3 4 5 6 7 8 9 10 11 12 13 14 15 16 17 18 19 20 21 22 23 24 25 26 27 28 29 30 31 32 33 34 35 36 37 38 [root@VM-12-17-centos ~]# docker inspect bridge [ { "Name": "bridge", "Id": "503c0700d33f270ca864970fa024534ecc0bf8c5103a6ad26850fb2aabf0249e", "Created": "2022-01-12T19:46:21.418794069+08:00", "Scope": "local", "Driver": "bridge", "EnableIPv6": false, "IPAM": { "Driver": "default", "Options": null, "Config": [ { "Subnet": "172.17.0.0/16", "Gateway": "172.17.0.1" } ] }, "Internal": false, "Attachable": false, "Ingress": false, "ConfigFrom": { "Network": "" }, "ConfigOnly": false, "Containers": {}, "Options": { "com.docker.network.bridge.default_bridge": "true", "com.docker.network.bridge.enable_icc": "true", "com.docker.network.bridge.enable_ip_masquerade": "true", "com.docker.network.bridge.host_binding_ipv4": "0.0.0.0", "com.docker.network.bridge.name": "docker0", "com.docker.network.driver.mtu": "1500" }, "Labels": {} } ]
bridge详解
在bridge模式下,连在同一网桥上的容器可以相互通信(若出于安全考虑,也可以禁止它们之间通信,方法是在DOCKER_OPTS变量中设置--icc=false,这样只有使用--link才能使两个容器通信)。
Docker可以开启容器间通信(意味着默认配置--icc=false),也就是说,宿主机上的所有容器可以不受任何限制地相互通信,这可能导致拒绝服务攻击。进一步地,Docker可以通过--ip_forward和--iptables两个选项控制容器间、容器和外部世界的通信。
容器也可以与外部通信,我们看一下主机上的Iptable规则,可以看到这么一条
1 -A POSTROUTING -s 172.17.0.0/16 ! -o docker0 -j MASQUERADE
这条规则会将源地址为172.17.0.0/16的包(也就是从Docker容器产生的包),并且不是从docker0网卡发出的,进行源地址转换,转换成主机网卡的地址。这么说可能不太好理解,举一个例子说明一下。假设主机有一块网卡为eth0,IP地址为10.10.101.105/24,网关为10.10.101.254。从主机上一个IP为172.17.0.1/16的容器中ping百度(180.76.3.151)。IP包首先从容器发往自己的默认网关docker0,包到达docker0后,也就到达了主机上。然后会查询主机的路由表,发现包应该从主机的eth0发往主机的网关10.10.105.254/24。接着包会转发给eth0,并从eth0发出去(主机的ip_forward转发应该已经打开)。这时候,上面的Iptable规则就会起作用,对包做SNAT转换,将源地址换为eth0的地址。这样,在外界看来,这个包就是从1 0.10.101.105上发出来的,Docker容器对外是不可见的。
那么,外面的机器是如何访问Docker容器的服务呢?我们首先用下面命令创建一个含有web应用的容器,将容器的80端口映射到主机的80端口。
1 docker run --name=nginx_bridge --net=bridge -p 80:80 -d nginx
然后查看Iptable规则的变化,发现多了这样一条规则:
1 -A DOCKER ! -i docker0 -p tcp -m tcp --dport 80 -j DNAT --to-destination 172.17.0.2:80
此条规则就是对主机eth0收到的目的端口为80的tcp流量进行DNAT转换,将流量发往172.17.0.2:80,也就是我们上面创建的Docker容器。所以,外界只需访问10.10.101.105:80就可以访问到容器中的服务。
除此之外,我们还可以自定义Docker使用的IP地址、DNS等信息,甚至使用自己定义的网桥,但是其工作方式还是一样的。
接入现有网络 容器化应用和未容器化部分
docker内置驱动 MacVLAN
可直接通过主机接口访问容器接口 缺点是要将主机网卡设置为混杂模式 公有云不支持
设置 macvlan 可为容器提供的ip范围参数之后 可以为容器创造出 MAC和IP 地址
https://blog.csdn.net/DeepRoute_Lab/article/details/126347110
Docker DNS服务 内置DNS解析器 embedded DNS server
1 2 3 4 5 6 7 8 9 10 11 12 13 14 15 16 17 18 19 20 21 22 23 24 25 26 27 28 29 30 31 32 33 34 35 36 37 38 39 40 41 42 [root@VM-12-17-centos ~]# cat /etc/resolv.conf ; generated by /usr/sbin/dhclient-script nameserver 183.60.83.19 nameserver 183.60.82.98 # 查看监听端口 [root@VM-12-17-centos ~]# netstat -l # 查看流量路径 [root@VM-12-17-centos ~]# iptables -nL Chain INPUT (policy ACCEPT) target prot opt source destination Chain FORWARD (policy ACCEPT) target prot opt source destination DOCKER-USER all -- 0.0.0.0/0 0.0.0.0/0 DOCKER-ISOLATION-STAGE-1 all -- 0.0.0.0/0 0.0.0.0/0 ACCEPT all -- 0.0.0.0/0 0.0.0.0/0 ctstate RELATED,ESTABLISHED DOCKER all -- 0.0.0.0/0 0.0.0.0/0 ACCEPT all -- 0.0.0.0/0 0.0.0.0/0 ACCEPT all -- 0.0.0.0/0 0.0.0.0/0 Chain OUTPUT (policy ACCEPT) target prot opt source destination Chain DOCKER (1 references) target prot opt source destination ACCEPT tcp -- 0.0.0.0/0 172.17.0.2 tcp dpt:3306 Chain DOCKER-ISOLATION-STAGE-1 (1 references) target prot opt source destination DOCKER-ISOLATION-STAGE-2 all -- 0.0.0.0/0 0.0.0.0/0 RETURN all -- 0.0.0.0/0 0.0.0.0/0 Chain DOCKER-ISOLATION-STAGE-2 (1 references) target prot opt source destination DROP all -- 0.0.0.0/0 0.0.0.0/0 RETURN all -- 0.0.0.0/0 0.0.0.0/0 Chain DOCKER-USER (1 references) target prot opt source destination RETURN all -- 0.0.0.0/0 0.0.0.0/0
容器之间通过名称ping通
1 –link=容器01 这样会直接在容器02的hosts文件里写死容器01的ip 并且是单向的 容器01hosts不存在容器02映射(不推荐,容器01ip变化会导致容器02连接不到)
2 自定义桥接网络 接入容器
1 2 3 4 5 6 7 8 9 10 11 12 13 [root@VM-12-17-centos ~]# docker network create --subnet=192.168.0.0/16 --gateway=192.168.0.1 mynet 9c171be6b7f03908755097b68239dbdc363eb4bbed8e94c21061b5486417e64d [root@VM-12-17-centos ~]# docker network ls NETWORK ID NAME DRIVER SCOPE 10bb6b5f0f1e bridge bridge local 1ed962b43486 host host local 9c171be6b7f0 mynet bridge local bcb19ab636e4 none null local [root@VM-12-17-centos ~]# docker run -d -P --name mynginx01 --network=mynet nginx 597c9e4c36ad1894c472f07ee9ab4da7acc2072e9043956a45aca3d9aff45419 # 也可用容器网络写 例如和mysql同一网络 [root@VM-12-17-centos ~]# docker run -d -P --name mynginx01 --network=container:mysql nginx
docker多机网络
覆盖网络 常用的方式 多机容器解决方案
允许单个网络包含多个主机,不同主机上的容器通信
多机工作原理
VXLAN技术